How to Identify a Real Emerald: A Complete Guide
 Emeralds have enchanted humans for thousands of years with their lush, captivating green hues. These gemstones symbolize rebirth, love, and prosperity, making them highly prized and often quite expensive. But with their popularity comes the risk of encountering imitations or synthetics posing as genuine emeralds.
If you’re considering buying an emerald or simply want to know how to tell a real one from a fake, this guide will walk you through the essential steps to identify a real emerald. From understanding its unique characteristics to practical tests you can do at home, by the end, you’ll have the knowledge to approach emeralds confidently.
What Makes an Emerald an Emerald? Emerald is a variety of the mineral beryl, specifically colored green by trace amounts of chromium and sometimes vanadium. This is what gives emeralds their characteristic green color, distinguishing them from other beryl varieties like aquamarine (blue) and morganite (pink).
Emeralds are treasured for:
- Their color, which ranges from a bluish-green to a deep, rich green.
- Their clarity, which almost always includes natural inclusions (flaws or “jardin”).
- Their hardness, which ranks 7.5 to 8 on the Mohs scale — fairly hard but more brittle than diamonds.
- These factors combined make emeralds both beautiful and delicate.
Why Is It Important to Identify a Real Emerald? Emeralds can be incredibly valuable, sometimes thousands of dollars per carat for high-quality stones. Due to this high value, many fake or synthetic emeralds flood the market, sometimes without buyers realizing it.
Identifying a real emerald ensures that:
- You protect yourself from scams or overpaying.
- You understand the true value of your jewelry.
- You appreciate the natural beauty and rarity of a genuine emerald.
Step 1: Understand Emerald Treatments and Synthetics Before trying to identify a real emerald, it’s crucial to understand that most natural emeralds are treated and that synthetic emeralds exist.
Natural emeralds nearly always have cracks or fractures, which jewelers fill with oils or resins to improve clarity and appearance. This treatment is common and accepted in the industry but should always be disclosed.
Synthetic emeralds are lab-created stones that have the same chemical composition and physical properties as natural emeralds but are generally less expensive and often flawless.
Finally, simulants are green stones or glass made to look like emeralds but with different compositions.
Understanding these distinctions helps set realistic expectations and guides your identification process.
Step 2: Observe the Color Carefully Color is the most striking feature of an emerald and your first clue in determining authenticity.
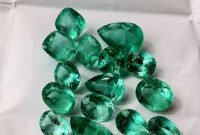
A real emerald typically has a vibrant, intense green color with good saturation and even tone. The best emeralds are neither too light nor too dark — they often show a slightly bluish-green hue.
If the green looks too bright, too uniform, or too dark, the stone might be synthetic, treated, or a simulant. For example, green glass can look shiny and bright but lacks the subtle depth of a real emerald’s color.
Remember that natural emeralds can have slight color zoning, meaning the green intensity may vary slightly within the stone. This is a normal trait and hard to replicate perfectly in synthetics.
Step 3: Look for Natural Inclusions (The “Jardin”) One of the most reliable ways to identify a real emerald is to examine its internal features under magnification. Natural emeralds almost always contain inclusions — tiny minerals, fractures, or gas bubbles trapped inside during the stone’s formation. These inclusions give emeralds their unique character and are affectionately called “jardin” because they look like a miniature garden or moss inside the stone.
Here’s what to look for:
- Natural inclusions: These may look like tiny crystals, thin needle-like structures, or irregular “fingerprint” patterns.
- Gas bubbles: Found in synthetic stones or glass but never in genuine emeralds.
- Swirling or curved lines: These are signs of glass or resin simulants.
If the stone appears perfectly clear with no internal flaws, it’s either synthetic or a high-grade treated emerald, which is rare.
Step 4: Use a Magnifying Glass or Loupe A jeweler’s loupe (usually 10x magnification) is a simple yet powerful tool for inspecting gemstones.
With a loupe, you can:
- Spot the inclusions inside the emerald.
- See whether the inclusions look natural or artificial.
- Check the edges and facets for signs of poor craftsmanship or glassy surfaces.
If you don’t own a loupe, you can find them at jewelry stores or online, and some jewelers will inspect stones for you.
Step 5: Feel the Weight and Density Emeralds are denser than many imitation materials like glass or plastic. This means that a real emerald will feel heavier than a fake of similar size.
If you have access to precise scales and tools to measure volume, you can calculate the specific gravity of the stone, which is a reliable indicator of authenticity. Real emeralds have a specific gravity between 2.7 and 2.8.
This test is more advanced and not practical for casual buyers but very useful if you’re serious about gemstone evaluation.
Step 6: Check the Cut and Craftsmanship Emeralds are often cut in a unique way known as the emerald cut, a rectangular shape with step-like facets. This cut is designed to enhance the stone’s color and reduce stress during cutting, preventing breakage.
Look for:
- Well-defined, sharp facets that reflect light evenly.
- Symmetry and polish that indicate quality craftsmanship.
- Cuts that maximize color rather than just sparkle.
Poorly cut stones or uneven facets can be a red flag, although not every poorly cut emerald is fake — some might just be lower quality.
Step 7: Conduct the Scratch Test (With Caution) Emeralds rank 7.5 to 8 on the Mohs hardness scale, meaning they are quite hard but can still be scratched by harder materials like sapphires or diamonds.
In a controlled environment, you might gently test a suspicious emerald by trying to scratch it with a material of known hardness (like quartz). A real emerald should not scratch easily.
However, be very careful with this method — scratching a valuable stone can damage it permanently. This test is generally better left to professionals.
Step 8: Observe the Stone Under Different Lighting Emeralds can look different depending on the lighting. A real emerald tends to show a rich green in natural daylight, while artificial light may make the green look duller or slightly different.
Try observing the stone under:
- Daylight or indirect sunlight.
- Warm incandescent lighting.
- Fluorescent lighting.
If the color changes dramatically or looks unnatural, it might be a fake or treated stone.
Step 9: Use the Fog Test This is a simple, informal test you can try at home.
Hold the emerald close to your mouth and breathe on it to create fog. A real emerald will clear up quickly because it’s dense and does not retain moisture on the surface. Fake emeralds, especially glass, will hold the fog for longer.
While this isn’t foolproof, it can be one small clue.
Step 10: Consult a Professional Gemologist If you’re still unsure about the authenticity of an emerald, the best course of action is to have the stone examined by a certified gemologist or send it to a gemological laboratory.
They have access to:
- Advanced tools like spectroscopy and refractometers.
- Experience in identifying treatments and synthetics.
- The ability to issue official certificates confirming authenticity.
This is especially important for high-value purchases.
Signs Your Emerald Might Be Fake To wrap up the identification process, here are some common red flags that might indicate a fake emerald:
- The green color is too perfect or too bright.
- The stone is completely flawless with no inclusions.
- The stone feels unusually light or heavy.
- You notice bubbles or swirling patterns inside.
- The price is suspiciously low for a large, high-quality emerald.
- The seller cannot provide any certification or history.
Caring for Your Real Emerald Once you’ve identified a real emerald and decided to purchase or keep it, knowing how to care for it is important.
Emeralds are more brittle than diamonds and can be damaged by harsh chemicals or sudden temperature changes. Clean your emerald gently with warm water and mild soap, avoiding ultrasonic cleaners or steam.
Conclusion Identifying a real emerald can feel daunting, but with the right knowledge and tools, you can confidently distinguish genuine stones from fakes. Look closely at color, inclusions, and craftsmanship; use magnification; and when in doubt, consult a professional.
Emeralds are treasures not only for their beauty but for their natural, unique character. Understanding how to identify a real emerald enriches your appreciation and ensures your jewelry investments are well-founded.


